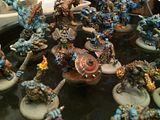
Four completed SS Squad Leaders with MP40's. My current Squad Leaders have Assault Rifles so I needed these guys to tag in for earlier scenarios. I actually painted a fifth figure but I forgot to put him in the picture. The neckless figure on the left in the field cap was a head swap, hence the no neck. The second figure from the left is the best figure in the whole range. He really looks good in the flesh. Figures are 28mm Bolt Action Miniatures. Just two figures to go to complete my unit (pending any new releases from BAM)!
Sunday, May 30, 2010
SS Squad Leaders with MP40's
Four completed SS Squad Leaders with MP40's. My current Squad Leaders have Assault Rifles so I needed these guys to tag in for earlier scenarios. I actually painted a fifth figure but I forgot to put him in the picture. The neckless figure on the left in the field cap was a head swap, hence the no neck. The second figure from the left is the best figure in the whole range. He really looks good in the flesh. Figures are 28mm Bolt Action Miniatures. Just two figures to go to complete my unit (pending any new releases from BAM)!Saturday, May 29, 2010
Zouaves for Jmilesr

Jmilesr asked for them so here they are. A generic Regiment of Union Zouaves. Once again based with Black Powder in mind. Figures are 15mm Peter Pig.
Wednesday, May 26, 2010
Confederate Cavalry
 Here is something different and out of left field. I have long wanted to do US and Rebel American Civil War armies in 15mm. I find the whole war very interesting, especially the generals. The dream has started. My first unit are Rebel Cavalry. This unit represents a Cavalry Regiment for the rules of my choice, Black Powder. Figures are 15mm Peter Pig Miniatures.
Tuesday, May 25, 2010
Kokoda - Documentary
 One of my favourite books "Kokoda" by Paul Ham has now been made into a documentry. I ran out and purchased the 2hr DVD asap. The cover of the DVD is really sad. It shows the end result of a successful bayonet charge (World War One style) across a jungle airstrip. War is truely bad. The book is good, the DVD is good. Get hold of either if you can.
Saturday, May 15, 2010
Battle of the Denmark Strait
 Two Fires Burning on Bismark
 HMS Prince of Wales on Fire. HMS Hood Cuts Across her Bow with Bismark and Prinz Eugen on the Horizon.
This weekend I had a Victory at Sea game with Godfrey. We played the historical events of the Battle of the Denmark Strait. Hood and Prince of Wales v Bismark and Prinz Eugen. I was commanding the Royal Navy, Godfrey was in charge of the Kriegsmarine.
History changed a bit. Bismark opened up on the Prince of Wales. Prince of Wales caught fire and became a wounded elephant. The Bismark took a magazine hit from the Hood early on in the battle. At one stage Godfrey had to fight seven fires which took a serious toll on Bismarks crew. I pounded Bismark with everything I had. Once the Bismark lost propulsion she was easy prey and sunk soon after.
Meanwhile the agile Prinz Eugen was ignored and came alongside Prinz of Wales with torpedo's that penetrated the ships torpedo belt. Prince of Wales became crippled, and two turrets exploded. Hood hunted Prinz Eugen, sending her to the bottom.
A really good game. I like Victory at Sea. A four ship game took 2 hours to play.
Friday, May 7, 2010
Waffen SS Panzergrenadiers 2nd Section
 My 2nd SS Panzergrenadier Section for Disposable Heroes is ready to go. Not much left to paint for the SS. Figures are Bolt Action Miniatures 28mm.
Thursday, May 6, 2010
Waffen SS MG42 Team
 Next team added to my SS Disposable Heroes unit. This time it's a MG42 Team. Figures are Bolt Action Miniatures 28mm.
Wednesday, May 5, 2010
Disposable Heroes Review

A lot of people on the internet ask about the rules mechanics for Disposable Heroes & Coffin for Seven Brothers. This is the best explantion available for the best WWII rule book in the world.
"The game is based around the platoon (or one platoon per player for multi-platoon games). The game begins with a roll for initiative where both players add their highest ranking Commander's Guts (leadership) score. The highest roll decides if they want to go first or allow his opponent to go first.The game turn sequence is a series of alternating unit activations.
During a players activation, he selects one unit to activate. That unit will act together (as a unit) and can move and fire, fire and move, or engage in close combat. The movement rates and distance you can shoot is determined by how far you move. For example, if you maneuver (6"), your firing is done at half the ROF and half range (some weapons, such as SMGs aren't affected by this). When a unit has activated you place a yellow counter next to it to indicate it has gone.
When you do fire, only half of the unit fires, but what models shoot is up to you (so you may choose to shoot the SMG and the LMG in the unit. This is important, and it is to represent that at any given time in action, not everyone is always firing their weapons. Simply put, in WWII, units did not fire to 100% efficiency. They were not firing squads. Some guys are firing, some loading, others observing or keeping their heads down etc. When you fire, you roll a number of D10 based on the weapons firing (their ROF) and your to hit is based on your Accuracy score (which is almost always 5). Cover modifies this down (you want to roll low). The type of cover determines by how much the ACC is lowered. Heavy cover has a -4, for example. Once you determine hits, you roll for wounds based on the AP (anti-personell) of the weapon. The player who's unit was fired upon chooses which casualties are removed. This way a unit can keep the squad weapons in action (representing assistants taking over etc.). There is a rule to allow leaders and special weapons to be removed though.
Movement distances are not modified by terrain. And cover has a nice abstraction to it: if one model in a unit can make it into the cover, the whole unit is pulled in and gets the benefit of cover. LOS is also done by cover. If you can draw LOS to the cover a unit is in, you can fire at the unit. No more drawing LOS to individual models (which are static and lifeless compared to real soldiers-who actively take cover).
There is a defensive "snap fire". A unit may snap fire at an enemy unit who moves within 12" of them, making units defensive in close so that you can't simply waltz in front of the enemy expecting them not to react.
Close combat is point blank and brutal. Once engaged, units will fight until one side is wiped out (surrenders, etc.). You have to make a Gut check to charge in and nearby units for both sides may sometimes be pulled in. If you are pinned when you get charged, you always fight last, meaning the units that pins the enemy then maneuvers into position to take them out will be sucessful rewarding realistic tactics.
Gut checks (morale) are taken every time a unit takes fire, regardless of the casualties. Casualties cause a -1 for each one inflicted and whatever various weapon morale modifiers (MM) apply (LMGs for example, cause a -2 MM). Also, cover modifies this back up. Meaning units in cover will negate some of the above negatives (but will only ever cancel them out, they won't take the units morale higher than it would be naturally. You can also use nearby leaders to bolster your morale (if they are within command radius-ie within their Guts score in inches away). So keeping your Lieutenant around is useful...they can also auto rally units as part of the commanders Activation. When units fail their Gut checks, they are pinned (activating them if they aren't already). Once pinned they must rally as part of their activation to act again. If a unit is pinned twice, they get pushed back 6" away. If they get pinned three times it is 9". So you can push the enemy out of positions.
Vehicles and AT guns etc. act somewhat like infantry (they activate the same way) and they have various movement rates. The big difference is that vehicles have to acquire their target before they can fire on it (meaning they are not "point and click" fire breathing monsters). Acquiring is a little like firing but with different modifiers. Once a vehicle acquires its target it can shoot at it. This represents several things: one, a vehicle is a crew of multiple individuals who must coordinate their activities. Two, it also represents the vulnerability of vehicles in close in terrain against infantry (who are much more mobile and can fire at them without hidnrance). Three, it means vehicles have incentive to maneuver for that nice shot. Once you become acquired, it often means you have to decide whether to slug it out or redeploy for a better shot. You will find vehicles actually MOVE in this game. No parking hub to hub and shooting it out like a battery of guns.
There are rules for lots of other things as well. Hidden units, setting up trip wires for heavy weapons (along which you can snap fire or ambush units who cross over-great for AT guns).There are rules for indirect firing and artillery, snipers, air attacks, off board artillery, para drops, etc. etc. Lots of things to give you the complete small unit skirmish package.
Overall, DH is a small unit skirmish game centered around the platoon. You essentially play the role of the platoon commander. You will be making platoon commander level decisions. You will be maneuvering and fighting with half sections or teams abiding by the "two steps down rule". This means that the platoon commander worries about what his squads and half squads are doing, and less about what individuals are doing (though of course, the individuals are important as to what weapons fire, etc. etc.). You will NOT be making individual combat decisions such as: "Private Snuffy goes prone and fires three shots from his Garand. That works for individual skirmish games, whereas DH is small unit action. This is a game where you can put a full platoon and support and vehicles on the table and play a game to conclusion in an hour (once familiar with the rules of course).You will find that the game plays fast, rewards real tactics, and is fun. You will pick up the basics within minutes of playing. If you accept that DH is not as detailed down to the individual level, you will find that DH is detailed at the platoon tactical level, but also that some important things are abstracted to achieve realism in results. It is a system dedicated to realistic results, not realism in process."
Sunday, May 2, 2010
SS Sniper Team
 SS Sniper Team based up for Disposable Heroes. Figures are 28mm Bolt Action Miniatures.
Subscribe to:
Posts (Atom)


.jpg)


fotor.jpg)


.jpg)